
Rendering from the frontend
Every report configuration in VeloxFactory has a built-in Generate PDF page: a small workstation for one report template that renders it directly from the browser, without writing a single line of code or touching the API. It is the fastest way to produce a PDF, test a configuration, or trigger a print job on demand.
The page follows one principle: settings once, then only the data. How the output should be produced, preview or print, which printer, how many copies, whether a history record is kept, is decided once per report and then stays out of the way. From there, every render is nothing but filling in the values that actually change and pressing one button.
generate-pdf.page.pngGenerate PDF page with the header row (report name, settings summary, Output Settings button), parameter table and the action row.
Opening the Generate PDF Page
There are two ways to reach the page. In the report configuration overview, each row has an action menu that contains Generate PDF, taking you straight to the render page. Alternatively, open a report configuration and use Generate PDF from within the report view.
The header row shows the report name and, as a compact summary line, the active data adapter and the stored output settings: mode, printer, copies, broadcast ID and whether a history record is created. The data adapter is either the assigned ReportConnectionConfig (including driver and database) or dyn. Array when no SQL connection is configured, and it decides which input sections appear further down.
report-config.index.action-menu.pngReport configuration overview, opened action menu with Generate PDF and Download.
Output Settings
The first time you open the page for a report, the Output Settings dialog opens by itself, because VeloxFactory does not yet know what you want to do with the result. Afterwards it only opens when you click the Output Settings button in the header.
| Setting | Default | Description |
|---|---|---|
| Mode | Preview and download only | Decides what happens with the rendered PDF, see the table below. |
| Printer | - | Printer picker over the active printer master data, free text is still allowed. Required in both printing modes. |
| Copies | 1 | Copies passed to the print service, between 1 and 100. Does not trigger multiple renders. |
| Broadcast ID | - | WebSocket channel of the print service. Filled in automatically when the chosen printer has one stored. |
| Create History Record | On | Saves request, response, PDF and thumbnail of every render to the report history. |
The three modes:
| Mode | Preview | Print task |
|---|---|---|
| Preview and download only | yes | no |
| Print only, no preview | no | yes |
| Preview and print | yes | yes |
In Preview and download only the printer and broadcast fields are hidden, there is nothing to print to. In the two printing modes a printer is mandatory: saving without one fails and the dialog reopens with everything you entered still in place.
Settings are kept per report configuration in your session. Two report templates therefore keep independent settings, they survive leaving the page and coming back, and they end when your session does. Clear settings at the bottom of the dialog removes them, the dialog then opens by itself on the next visit.
generate-pdf.settings-modal.pngOutput Settings dialog with mode dropdown, printer picker, copies, broadcast ID, history toggle and the Clear settings button.
Report Parameters
If the report defines parameters, a parameter input table is shown. Each parameter gets its own typed input field, derived automatically from the Java class declared in the .jrxml:
- A
java.lang.Stringparameter becomes a text field. - A
java.sql.Dateparameter becomes a date picker. - A
java.lang.Integerparameter becomes a number input with integer constraints. - A
java.lang.Booleanparameter becomes a toggle switch. - And so on for all supported types.
Parameters marked as required in the report configuration must be filled in before the form can be submitted. Optional parameters can be left empty, VeloxFactory silently drops empty parameter values and does not include them in the render request.
Report Lines - Manual Data Entry
The Report Lines section only appears when the report has no SQL connection assigned, i.e. when the data adapter is dyn. Array. In this case, VeloxFactory has no database to query, so the detail band data must be entered manually in the browser.
The section shows a table with one column per field defined in the report. Each cell contains a typed input matching the field's data type. You fill in one row of values per data record you want to appear in the report.
To add more rows, use the Add Row button, it clones the input row and appends a new empty one. Individual rows (except the first) can be removed with the delete button on the right. Empty fields are not transferred to the render request.
Less typing: prefill, example values, clear
Three small helpers remove most of the repetitive work when the same report is rendered again and again:
- Prefill from the last run. Parameters and report lines come back filled with the values of your previous render in this session. The values are stored on every submit, successful or not, so a failed render can be corrected instead of retyped.
- Fill example values. Fills every parameter and the first line row with the example values stored in the report configuration. This is the frontend counterpart of the API's
useExampleValues, useful for a quick smoke test of a new template. - Clear inputs. Empties all parameters and removes every line row except the first one.
Resources
If the report has image resources, a collapsible Resources section is available on the page. It shows a preview thumbnail of each resource file, its parameter name, and its file name. Resources are handled automatically at render time, you do not interact with them during rendering. The section is informational only, confirming which image files are currently assigned.
Generating
Once the values are in place, click Generate. There is no confirmation dialog any more, the stored output settings already answer everything it used to ask. The request is processed synchronously, the page waits for the result and displays it immediately.
The Result
Success
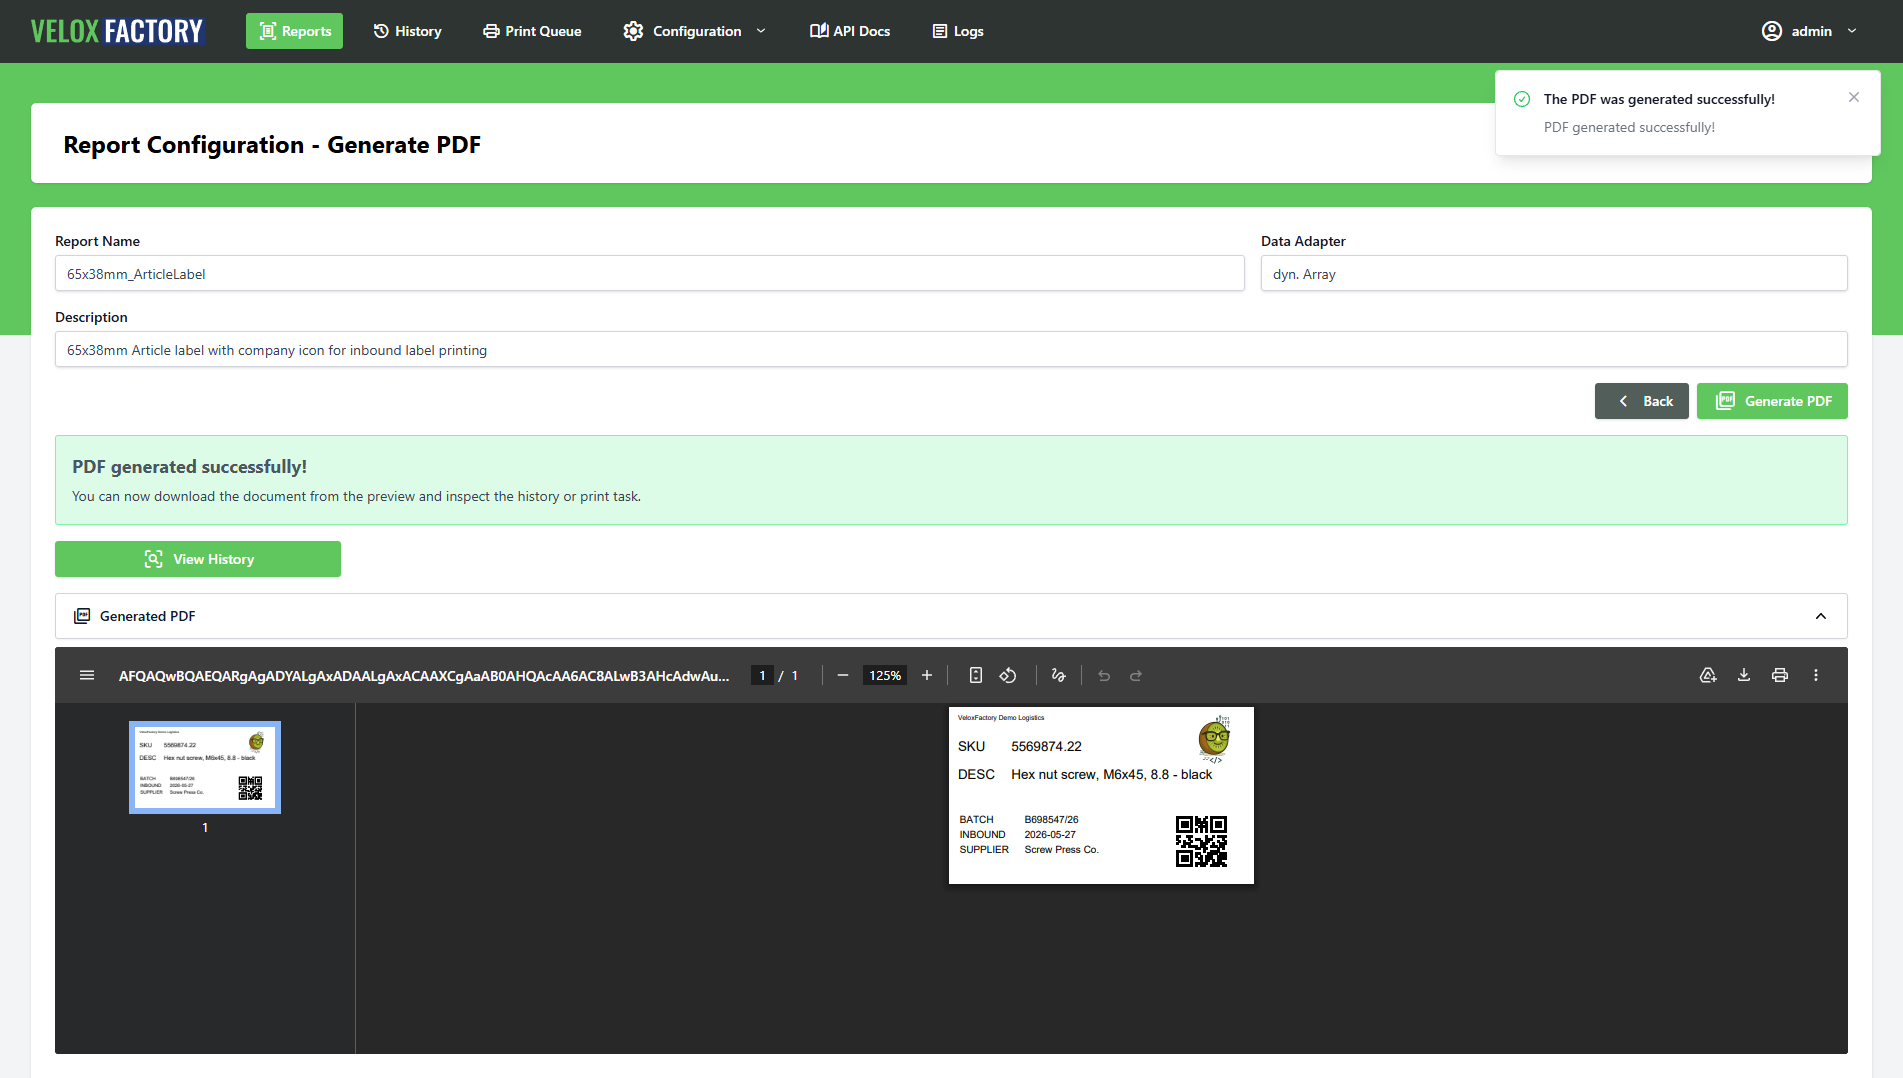
In the two modes with a preview, the page shows a green confirmation banner, a Download PDF button and the generated PDF as an inline preview, sized to the report's actual page dimensions. If a history record was created, the download button serves the stored file, otherwise the PDF is offered straight from the response.
In Print only, no preview is rendered at all. The banner then reads Sent to <printer> (<n>x), which is the whole point of that mode: a station that prints and moves on.
If a history record was created, a View History button links to the new ReportHistoryRecord. If a print task was dispatched, a View Print Task button links to the ReportPrintTask where you can follow its status.
Errors
If the render fails, the page shows a red error banner listing all error messages returned by VeloxFactory, and everything you entered stays on screen. Common causes are missing required parameters, a SQL query that returns no rows, or a resource file that was removed after the configuration was last saved.
If a history record was created before the error occurred, the failed attempt is recorded including the error details, which is useful for diagnosing what went wrong.